
Creating Your Content Strategy
Click to open content planner template in Canva.
Inside this template you will learn how to:
Plan your content.
Work your promo content in with your regular content.
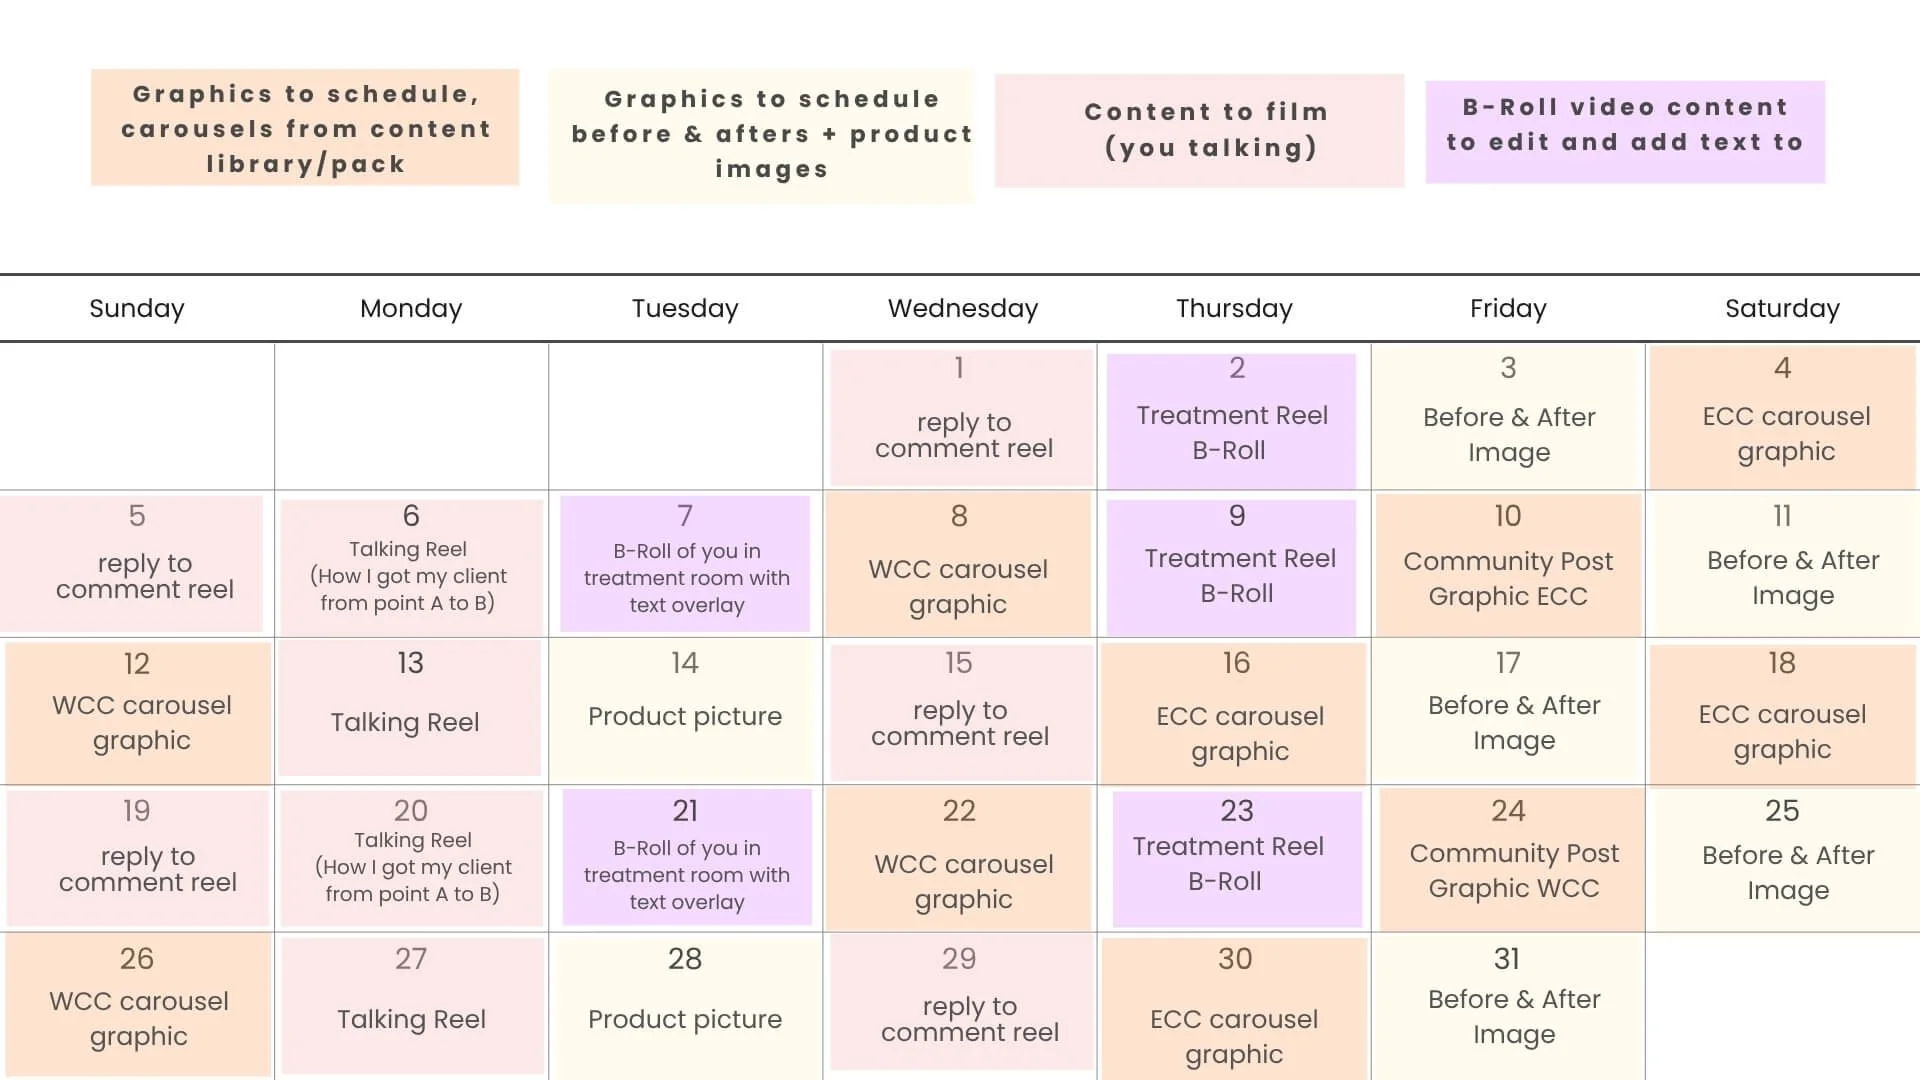
Learn how to film a “Reply with comment Reel”.
Learn how to film a “Talking Reel
(How I got my client from point A to B)”.
Since you’re in The Esti Content Club, you already have one of the biggest time-savers in your marketing toolkit, all your ready-to-use content drops 7 days before the end of each month. The trick now is knowing how to plan, batch, and schedule so posting feels easy (and consistent).
I teach something I call the PECs Content Strategy, which means your content should rotate between:
Personality – show who you are, your vibe, and your unique point of view
Education – teach your audience something that positions you as the expert
Client-Focused – speak to your client’s needs, struggles, and desired results
Social Proof – testimonials, before/afters, rebooking wins, and happy client moments
Here’s how to make it all flow with minimal stress.
Step 1 – Pick Your Posting Frequency
There’s no one-size-fits-all here. Decide what feels realistic for you right now: 3x a week, 5x a week, or 7 days a week.
Your posting frequency will determine how much content you need to batch each month. With all of the content available to you it will be easy for you to post more frequently.
Step 2 – Assign One Content Type to Each Day (and Calculate Your Monthly Post Count). The content planning template above provides a visual tool to help you do this.
When you give each day of the week a “content theme,” you instantly remove the decision fatigue of “What should I post?”
If You’re Posting 3x a Week:
Tuesday – Education (ECC reel ideas or carousels)
Thursday – Client-Focused (skin struggles, service spotlights)
Saturday – Social Proof (before/after, testimonial, rebooking story)
📆 Monthly Breakdown (Approx. 12 Posts):
4 Education
4 Client-Focused
4 Social Proof
💡 Mix in Personality once or twice a month by swapping it in for Education or Client-Focused.
If You’re Posting 5x a Week:
Monday – Personality
Tuesday – Education
Wednesday – Client-Focused
Friday – Education (or trending reel)
Saturday – Social Proof
📆 Monthly Breakdown (Approx. 20–22 Posts):
4 Personality
8 Education
4 Client-Focused
4–6 Social Proof
💡 Use Stories to fill in Personality content on non-Personality days.
If You’re Posting 7x a Week:
Monday – Personality
Tuesday – Education
Wednesday – Client-Focused
Thursday – Social Proof
Friday – Education
Saturday – Personality
Sunday – Client-Focused
📆 Monthly Breakdown (Approx. 28–30 Posts):
8 Personality
8 Education
6–8 Client-Focused
6–8 Social Proof
💡 Keep Sunday’s post light, quick skin tip, seasonal reminder, or easy booking prompt.
Step 3 – Set Dedicated Content Days
Batching your content is a game-changer, and the easiest way to do it is to assign one content task to each day of your workflow week.
Here’s a schedule you can try:
Planning Day – Look at your analytics, decide your content themes, and select your ECC templates. Be sure to mark at least 4 “reply to comment” reels for the month to boost engagement.
Filming Day – Record any videos or B-roll you need for the month.
Graphics Day – Customize ECC graphics and carousels.
Scheduling Day – Upload and schedule everything in your content planner so it’s ready to go.
Step 4 – Make It Easy to Stay Consistent
Remember, your goal isn’t perfection, it’s consistency. With The Esti Content Club, you already have done-for-you ideas, graphics, and captions ready to plug into your plan. When you combine that with a clear posting frequency and batching schedule, content creation stops feeling like a daily chore and starts feeling like a system.
So, before your next month starts:
Choose your posting frequency
Assign each day a content type
Count how many posts of each type you need
Use your ECC content drop to batch and schedule them ahead of time
Step 5 – The 2 Types of Content I Want You Sharing
There are two powerful types of content I want you to start using regularly.
1. The Client Journey (Point A → Point B) Reel
Showcase a real client transformation by sharing a before-and-after. Here’s how:
Upload the before-and-after to a Canva page sized for Stories.
Download it as a PNG to your phone.
Upload it to Reels using the Green Screen effect.
While recording, walk viewers through how you helped your client get from their “before” to their “after.” Use your client’s first name (with permission), this adds a personal, human touch to the results you’re showing.
2. The “Reply to Comment with Reel” Reel
When you reply to a comment on any of your posts, click the camera icon and record your reply as a Reel instead of just typing it out. Aim to post this type of Reel at least once a week. It’s a great way to show your audience that you’re building a real community, not just posting sales content.
These two formats together will help you build trust, encourage engagement, and keep your audience coming back for more.
You got this! Remember, I’m here to support you, so reach out if you have any questions! 👇
Step 6 – Sharing More Content of Your Face
I know showing your face on camera can feel intimidating, but it's one of the best ways to build trust with your audience. Here are different ways to ease into it:
Talking Videos: Think 30ish-second-long videos of you talking to the camera. I provide examples every month. Click here if you are in the Esti Content Club or here if you are in the Waxers Content Club to visit the Talking Reels Script page.
Content of you in your treatment room: Videos or pictures of you in your treatment room. Click here for the Branding Resources and Content Inspo Library, and then look at the “Treatment Room” content tab.
Content of YOU in your treatment room: Videos or pictures of you in your treatment room, but the focus is on you. Click here for the Branding Resources and Content Inspo Library, and then look at the “Portraits & Personal Branding” content tab.
Trending Reels: Those fun lip-syncing Reels if they match your brand. I provide new ideas for these every week in the Relevancy Report. Click here to visit theReels & TikTok ideas page.
Selfie Carousels & About You Content Templates: Select the “About Me” section on the template library to access these templates. Simply swap your images into the templates.
Click for the Esti Content Club Template Library or Click here for Waxers Content Club Template Library